
Full Step by Step how To: Billet Intake Manifold Plenums 1994-2003 7.3L Powerstroke
Oct 9th 2025
Full PDF Instructions can be downloaded here: https://www.riffraffdiesel.com/content/RESOURCES/Riffraff_Diesel_Billet_Plenum_Instructions.pdf
Product Link: https://www.riffraffdiesel.com/riffraff-diesel-billet-intake-manifold-plenums-1994-2003/
IMPORTANT: Before starting installation, please be sure that all items supplied with the kit are accounted for.
Parts Required: Riffraff Diesel Billet Manifold Plenums 1994-2003 including:
- (2) Billet plenums
- (2) Viton o-rings
- (1) Installation hardware packet
Recommended Parts:
- Turbo/pedestal o-ring kit: Part# GZ-9-003
- Fuel line sleeves: Parts# (2) GZ-7-004, (1) GZ-7-005, (1) GZ-7-006
- HPOP quick disconnect hose removal tool: Part# 6595
- Fuel feed line SS braided hose kit: Part# RDP-FFL-SD
1. Disconnect the negative cable from both batteries.
2. Remove the Powerstroke Engine Cover (If installed)
3. Remove the air cleaner intake tube from the valve cover bracket and the turbo assy. Remove the (2) bolts at the bracket and the clamps on the intake tube. Pull the intake/ CCV adapter out of the CCV hose by pulling straight up. The crimped clamp will remain on the CCV hose.
4. Drain the fuel bowl by placing a 3/8” hose over the fuel drain tube. Open the fuel bowl drain and allow the fuel to drain.
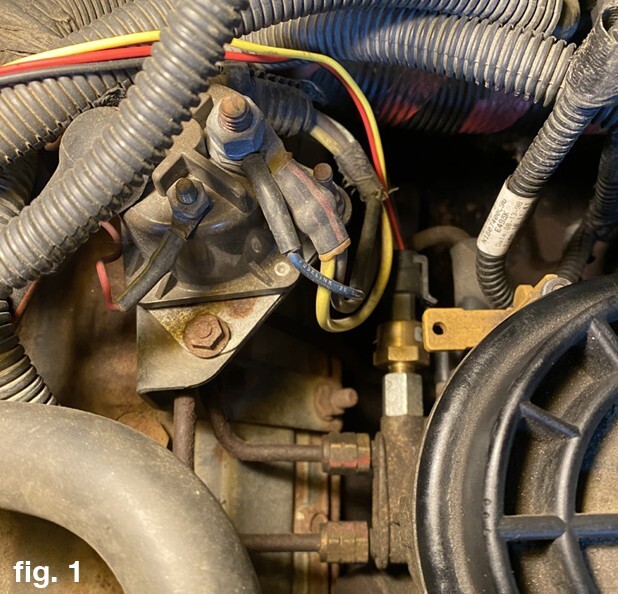
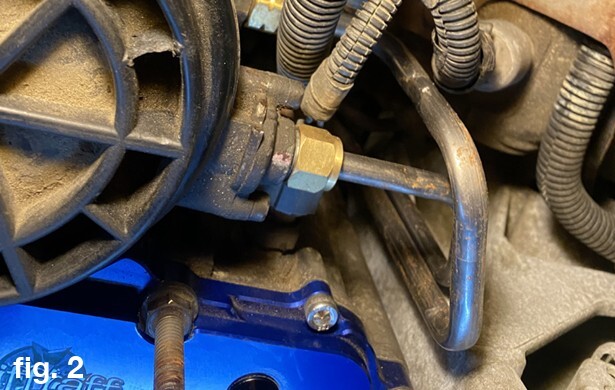
5. Remove the four (4) fuel lines from the fuel bowl. Remove the two (2) 1/4” lines on the passenger side with a 9/16” wrench. The return line and feed line are on the driver’s side. The return line is removed with a 5/8” wrench and the feed line is removed with a 3/4” wrench. Slide the fuel drain tube hose adapter off the drain valve. (fig. 1, fig. 2)
6. Remove the heater connector from the rear of the fuel bowl.
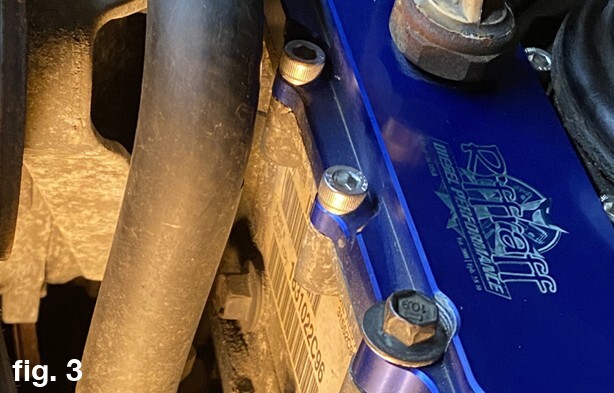
7. Remove the two (2) bolts for the fuel bowl located on the forward side of the HPOP Reservoir (fig. 3). If you have an FRx installed, disconnect the hoses from the heads.
8. Remove the fuel bowl from the engine.
9. Remove the turbo from the engine using ’99-’03 7.3L Turbo Removal and Reinstall Instructions.
10. Remove the turbo pedestal by removing the EBP Solenoid Connector (if installed), then remove the four (4) bolts using a 10mm socket. Lift the pedestal out of the valley and set it aside.
11. If desired, disconnect the two HPOP hoses from the head connections using the RDP HPOP Hose Quick Disconnect Tool (Not required but allows for more workspace).
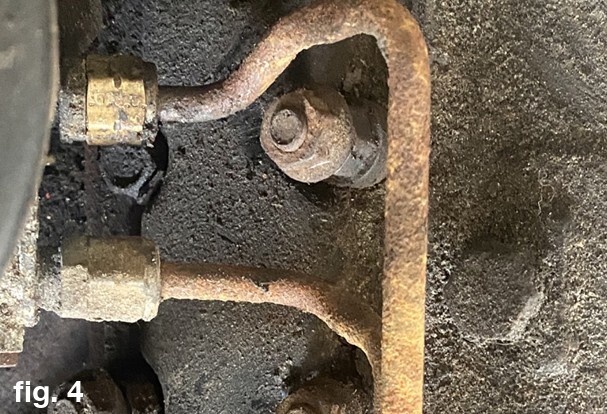
12. Remove the three (3) nuts common to the GPR/AIH bracket (if installed). Depending on model year and options, the bracket may only use two (2) nuts. Remove bracket assembly from the studs and tie back away from the plenum. (fig. 4)
13. Remove the nut from the passenger side fuel line clamp. The specific location of the clamp may vary with model year.
14. Remove the nut for the AIH ground wire from the driver’s side plenum stud. Remove the wire and place to the side.
15. Remove the plenum ten (10) bolts/studs from each plenum. Note: The passenger side plenum forward lower bolt cannot be fully removed. The plenum is slotted for this fastener and can be slid aft to remove without removing the bolt fully.
16. The stock plenums are sealed in place with RTV. Use a thin scraper or putty knife to break the bond between the plenum and head.
17. Remove both plenums and use rags in the heads to keep debris from entering the intake tract.
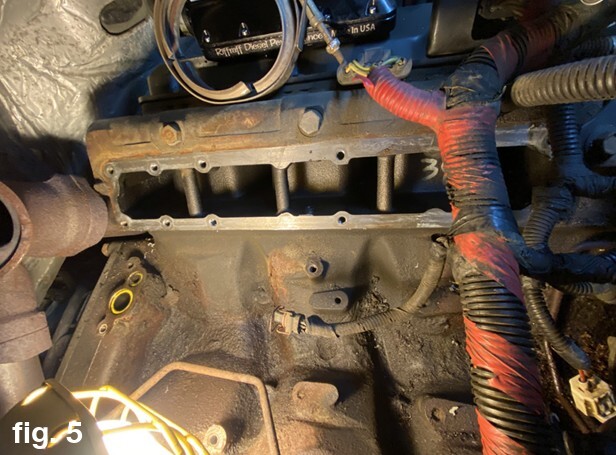
18. Clean the remaining RTV off of the heads using a non-metallic scraper or Scotch-Brite® and solvent. This will prepare the surface for the o-ring seals on the billet plenums (fig. 5). If in a cold climate, you may need to stretch the supplied o-rings when installing them into the billet plenums due to shrinkage.
19. On the passenger head forward lower bolt, turn it out until it contacts the front cover.
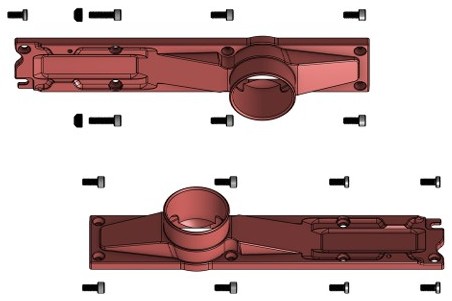
20. Clean the head to plenum surface and remove the protective rags. Install the plenums on each head using the included hardware. Use the 18mm long, standard-profile head bolts in the deeper bolt holes and the 18mm long, low-profile head bolts in the shallower bolt holes. If you have a GPR/AIH Relay bracket, insert two (2) deep countersink spacers at the location shown and use two (2) 30mm long bolts to fasten the bracket. (fig. 6)
Fitment Note: The hardware included with the plenums is intended to secure the plenums and GPR/AIH bracket only; if the fuel line clamp and AIH ground wire will be re-used, customer will need to make provision for the reinstallation of those items. We suggest the RDP-FFL line kit in place of the stock fuel lines.
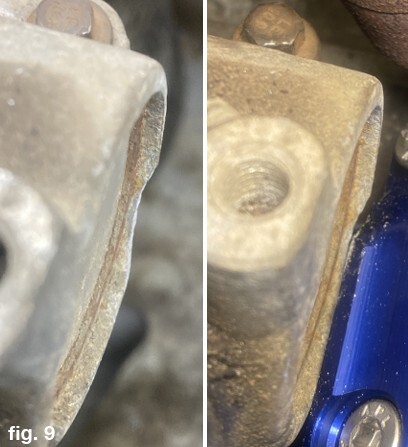
Fitment Note: For early 1999 pickups using the stock EBPV turbo pedestal, the EBPV actuator housing on the driver’s side of the pedestal will require grinding to clear the billet plenum. See reference picture (fig. 9).
21. Torque the bolts to 89 in-lb.
22. If disconnected earlier, reconnect the HPOP hoses to the heads making sure they engage firmly into the fittings and cannot be pulled free.
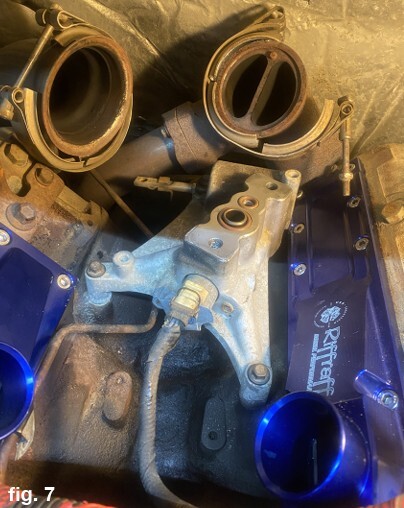
23. Using new o-rings, install the turbo pedestal. Torque the four (4) bolts to 18 ft-lb. (fig. 7)
24. Remove the plenum boots from the old plenums and install onto the billet plenums. Tighten the lower clamps to 60 in-lb.
25. Reinstall the turbo onto the pedestal using ’99-’03 7.3L Turbo Removal and Reinstall Instructions.
26. Reinstall the fuel bowl by loosely installing the two (2) bolts through the HPOP Reservoir. Once the threads engage into the fuel bowl start each of the four lines (use new Fuel Line Sleeves: (2) GX-7-004, (1) GZ-7-005, (1) GZ-7-006) making sure they are started straight and have a few threads engaged. Fully tighten the fuel bowl bolts to 23 ft-lb.
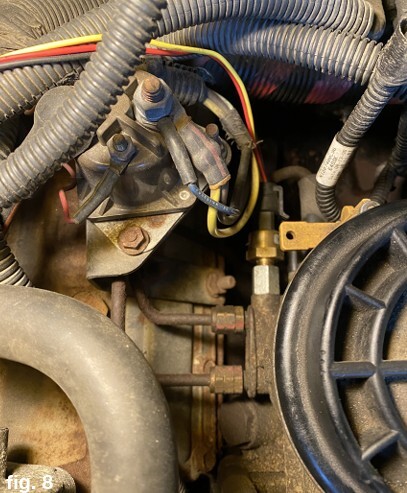
27. Tighten the fuel lines to the fittings. Make sure the tube nut contacts the fitting and there is no gap. (fig. 8)
28. Connect the fuel bowl heater/water in fuel connector to the fuel bowl.
29. Reinstall the air cleaner intake tube from the valve cover bracket and the turbo assy. Install the two (2) bolts at the bracket and the clamps on the intake tube. Insert the intake/ CCV adapter into the CCV hose by pushing straight down.
30. Reconnect the ground cables to the batteries.
31. Cycle the key 3-4 times for 20-30 seconds each cycle. This will recharge the fuel bowl. Inspect the fuel bowl for leaks as you do this.
32. Start the truck and look for leaks. If you disconnected the HPOP hoses, you may experience a slow-to-start or rough idle condition. This will clear out after driving roughly 50 miles.
***Disclaimer: The information provided on this blog is for informational purposes only. We share our knowledge and experience, but we are not liable for any damages, injuries, or losses that may occur as a result of using this information. Situations are rarely cut and dry in the automotive world. Your situation will likely be somewhat different than what we describe here. Use your best judgment and always consult a qualified professional for automotive repairs and modifications. Your safety is your responsibility.


