
7.3L Powerstroke HPOP Replacement - Step By Step How To
Apr 24th 2026
If you are replacing the HPOP on a 7.3L Powerstroke, having a step-by-step guide matters. These instructions cover the required parts, recommended tools, pump installation, IPR reassembly, oil refill, and the final checks needed to help the truck start cleanly and stabilize after the swap.
Parts Required:
- (1) T500 HPOP with gasket (or other 7.3 HPOP)
- (4) Fuel line sleeves - (2) 1/4”, (1) 5/16”, (1) 3/8”
- (1) IPR o-ring kit - GZ-14-008
Recommended Tools:
- (1) HPOP line disconnect tool - 6595
- Standard and metric sockets and wrenches
- Fluid pump to drain the HPOP reservoir
1. Remove both of the ground cables off of the batteries.
2. Remove the Power Stroke engine cover (if installed) using a 13mm deep socket.
3. Drain the fuel bowl by placing a 3/8” hose over the fuel drain tube. Open the drain lever on the fuel bowl to allow the fuel to drain completely.
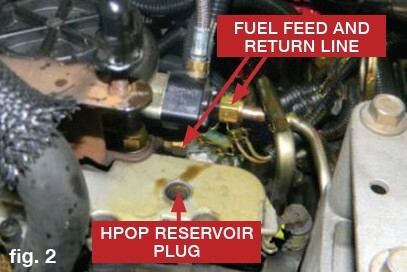
4. Remove the 3/16” Allen plug from the HPOP Reservoir top. Insert a suitable hose into the reservoir and apply vacuum to remove the reservoir oil. Draining the oil now will reduce the mess later. A soap bottle pump works well in a pinch here, just make sure it's clean first.
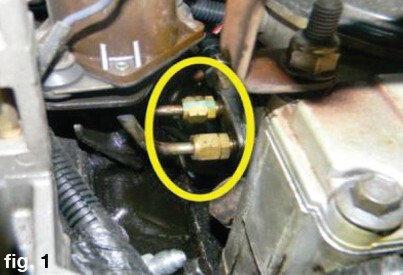
5. Remove the fuel lines from the fuel bowl. Remove the two (2) 1/4” lines on the passenger side using a 9/16” wrench. The Return line is on the drivers side and is 5/8”, the feed line is also on the drivers side and is 3/4”.
6. Remove the fuel bowl heater connector from the fuel bowl.
7. Remove the fuel drain valve sleeve off of the valve by sliding aft to the drain tube.
8. Remove the Exhaust Back Pressure Sensor (EBPS) using a 9/16” wrench and a 1” wrench. Remove the EBPS tube from the front cover nipple bracket using a 9/16” and 5/8” wrench.

9. Remove the fuel bowl attach bolts two (2) using a 13mm socket. The fuel bowl will now be able to be removed from the engine.
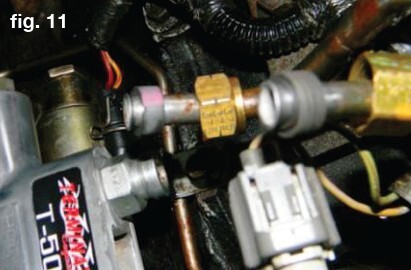
10. Using the HPOP Line Release Tool, slide the tool in between the hose flange and the rubber cover. This will unlock the hoses from the fittings so you can remove the hoses from the HPOP.
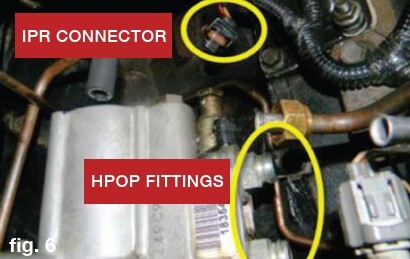
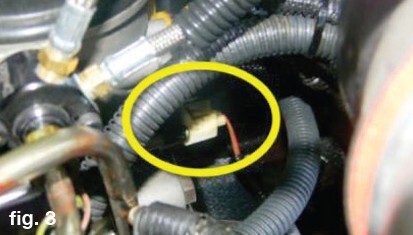
11. Disconnect the Injector Pressure Regulator (IPR) connector. Flip the wire bail up to unlock.
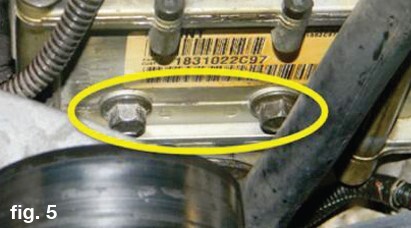
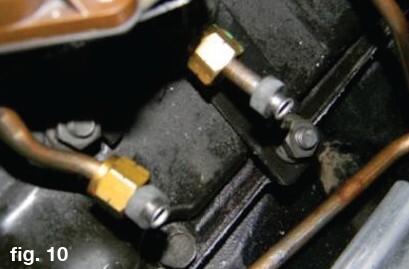
12. Remove the front cover access plate by removing the two (2) bolts (8mm). The cover is sealed on with RTV, use caution when removing it.
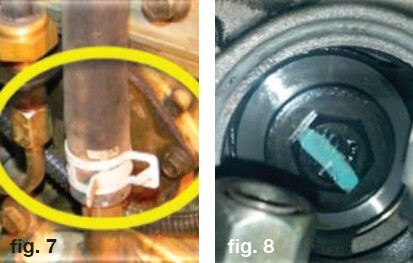
13. Using an 18mm socket, loosen the bolt from the HPOP Drive Gear. Be careful not to drop the washer in the front cover. It may be necessary to hold the engine from turning while loosening the drive gear bolt.
14. Remove the two (2) bolts (10mm) from the HPOP to the front cover. You will now be able to remove the HPOP from the engine. The drive gear will remain in the front cover.
15. Place rags in the engine valley to absorb any oil.
16. Using a 1 1/8” wrench or special socket, remove the IPR and install it in the new HPOP using new o-rings (found in the GZ-14-008 kit). Tighten to 53 in-lbs.
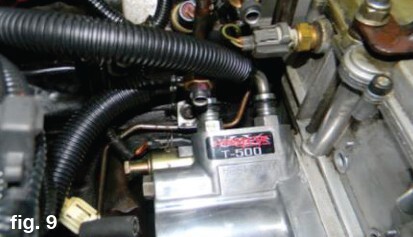
17. Install the new HPOP and gasket, install the bolts but do not torque fully yet. Align the HPOP drive gear onto the pump shaft. The drive gear should be checked to verify it is fully seated on the shaft before installing the drive gear bolt and washer. Torque the bolt to 95 ft-lbs.
18. Torque the pump and attach two (2) bolts to 18 ft-lbs now.
19. Attach the HPOP hoses to the HPOP. They will click when installed fully and will not be able to be removed.
20. Install the IPR connector onto the IPR and secure the wire clip.
21. Remove any rags in the engine valley.
22. Apply RTV to the drive gear access cover and install the two (2) bolts using a 8mm socket. Torque to 8-10 ft-lbs.
23. Install the fuel bowl into the valley. Position all of the four (4) fuel lines onto the fi ttings using new sealing sleeves. (Old sleeves can be removed with a 90º pick. Just be careful you do not gouge the line). Start all four (4) lines onto the fi ttings. Do not tighten fully.
24. Insert the fuel bowl attachment bolts through the HPOP reservoir and into the fuel bowl. Align the fuel bowl where the bolts will engage the threads properly. Tighten the bolts down to 18 ft-lb.
25. Thread the EBPS tube onto the front cover nipple and tighten the tube nut.
26. Install the EBPS and reconnect the connector.
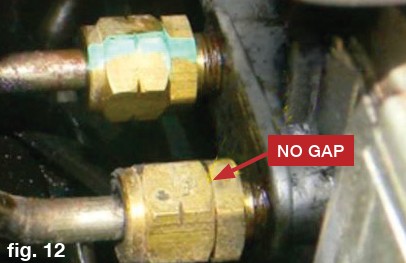
27. Tighten the four (4) fuel lines until the compression nut touches the brass fitting. There should be no gap between the fuel line nut and the fi tting.
28. Slide the fuel drain line sleeve over the fuel drain valve.
29. Install the fuel bowl heater connector.
30. Close the fuel drain lever.
31. Pour in about one (1) quart of diesel engine oil into the HPOP reservoir to refi ll it (oil level should be about 1” from the plug hole) and install the 3/16” plug.
32. Reconnect the ground cables to the batteries.
33. Turn on the key to run (do not crank). Leave the key on 20-30 seconds and turn off . Repeat this 2-3 times. This will allow the fuel bowl to replenish with fuel.
34. Check the fuel lines and bowl for any signs of leaks.
35. Check the engine oil to verify the level on the stick is correct.
36. Crank the engine over until it starts up. This may take several seconds to several minutes depending on how much air is in the high pressure oil system. Do not operate the starter for more than a minute at a time. For every minute of cranking, allow two minutes of cool down time. Most engines will start within the initial minute of cranking. If the truck fails to start, verify the oil level in the HPOP reservoir and top off as required (reinstall the plug before cranking again). Having a battery charger around will ensure the batteries remain fully charged during this process.
37. Once the engine starts it will run rough at first. Allow the engine to idle for a few minutes. After a few minutes of normal idle, you can hold the idle at a high idle setting (~1200 RPM). This will help move more oil through the system and help purge air.
38. Check for fuel or oil leaks around all connections.
39. Install the Powerstroke engine cover.
40. You will need to drive the truck for about 50 miles before all the air is purged and it will begin to start normally (less cranking). ICP and IPR Duty Cycle will stabilize after the 50 miles of driving also.
Special thanks to Ken (Woodnthings of FTE) for photos and instructions.


