
7.3L Powerstroke Glow Plugs: Full step-by-step how-to replacement
Sep 12th 2025
Full PDF Instructions can be downloaded here: https://www.riffraffdiesel.com/content/RESOURCES/Riffraff%20Diesel%207.3L%20Glow%20Plug%20Replacement.pdf
Product Link:
Glow Plugs: https://www.riffraffdiesel.com/glowplug-zd-30-94-03-7-3l/
Doghouse O-rings: https://www.riffraffdiesel.com/ccv-vent-cover-orings/
IMPORTANT: Before starting installation, please be sure that all items which were supplied with the kit are accounted for.
Parts Required:
- (8 required) MotorcraftGlow Plug ZD-30 (Motorcraft ZD-11 have been superseded to ZD-30)
- (1 suggested) CCV Doghouse O-Ring Kit GZ-8-004
Recommended Tools:
- Standard wrenches and sockets.
Instructions:
1. Disconnect the Ground terminals from both batteries.
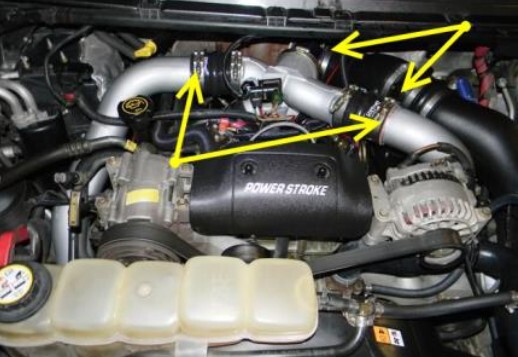
2. Remove the Intercooler Charge Air Tube clamps from the intake spider. Then loosen the clamps from the intercooler. The Charge Air Cooler (CAC) Tubes can now be removed from the truck.
3. Remove the intake tube from the air filter box to the turbo. You will need to remove two 8mm bolts from the bracket at the valve cover to remove the whole assembly. Pull the assembly out of the hose connecting the intake tube to the Crankcase Ventilation (CCV) Doghouse.
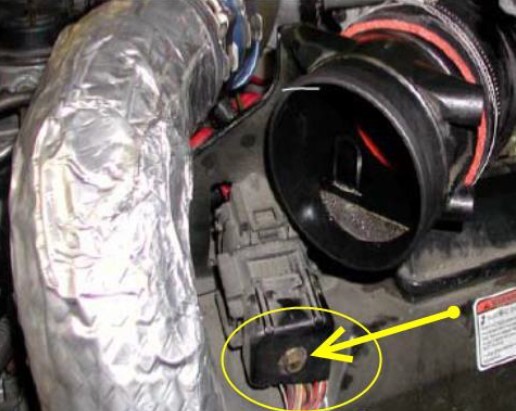
4. On the drivers side, using a 10mm socket, loosen the 41 pin connector retaining bolt to allow you to unplug the connector. Unplug and place on the fender liner.
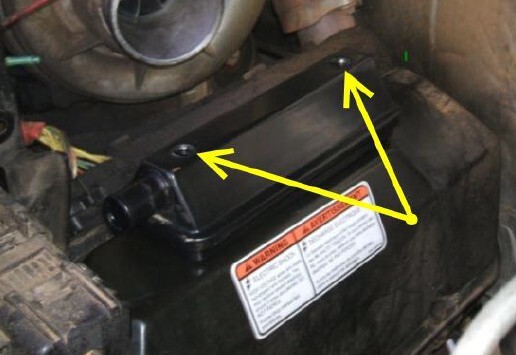
5. Remove the two screws from the CCV Doghouse. Discard the O-rings.
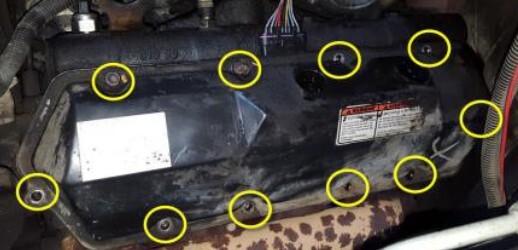
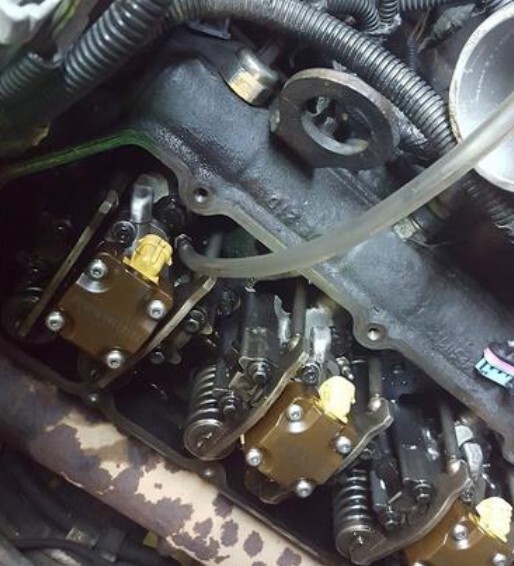
6. Remove the 10 bolts retaining the valve cover to the engine. Note locations of brackets and studs for reinstallation. Remove Valve Cover.
7. Remove the Passenger side Valve Cover bolts and remove the Valve Cover from the engine. Pay attention to stud locations for reinstallation. You do not need to remove the Oil Dip Stick Tube, just remove the nut and move to the side to provide clearance. To remove the Valve Cover, route the cover aft and towards the turbo, this will provide enough room for the front to clear the AC Compressor.
8. To locate the Glow Plugs, follow the white wires from the UVCH to the Glow Plug. Disconnect the wires by pulling straight up as they are a push on style connection.
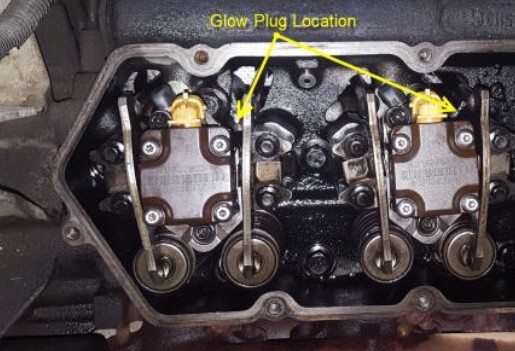
9. The Glow Plug will more than likely be hidden in a pool of engine oil. Remove the oil from the area using rags or a vacuum pump. This will keep oil from dripping down into the Glow Plug cavity when removed.

10. Using a 10mm deep socket, loosen the glow plug. A piece of ¼” ID fuel hose will slide onto the glow plug and allow you to unscrew it and remove it from the head. Repeat this for the other seven Glow Plugs.
11. Install the new Glow Plugs using the fuel hose and thread into the head at all eight locations. Using a 10mm Socket, torque the Glow Plugs to 14 ft-lbs.
12. Install the White Wires to the appropriate Glow Plug and ensure they are connected. This can be verified by making a resistance check from the UVCH Connector using an Ohm Meter.
13. Reinstall the Valve Covers to the engine and tighten the bolts and studs to 98 in-lbs.
14. Reinstall the CCV Doghouse Breather using new O-rings (recommended).
15. Install the 41 Pin Connector by sliding the connector together then tighten the 10mm Bolt until snug.
16. Install the Air Intake Tube to the turbo and engage the CCV Hose to the intake port. Push down until fully seated. Reinstall the (2) bolts using an 8mm socket. Tighten the clamps at the turbo and the Filter Air Box.
17. Reinstall the Charge Air Intercooler Pipes to the intercooler, ensuring the clamps are installed and tightened. Align the CAC Tube to the spider and install the boots and tighten clamps.
18. Reinstall the Negative Battery Terminals and tighten.
19. Start the truck and enjoy your new Glow Plugs and easier starting.
***Disclaimer: The information provided on this blog is for informational purposes only. We share our knowledge and experience, but we are not liable for any damages, injuries, or losses that may occur as a result of using this information. Situations are rarely cut and dry in the automotive world. Your situation will likely be somewhat different than what we describe here. Use your best judgment and always consult a qualified professional for automotive repairs and modifications. Your safety is your responsibility.


