 How To - 7.3L Powerstroke")
Hutch and Harpoon Mod (Banjo and Hutch) How To - 7.3L Powerstroke
May 13th 2026
The Banjo and Hutch (aka Hutch and Harpoon) mod were one of the first "budget" mods for the 7.3L Powerstroke. The Harpoon mod when done, allows for more complete fuel fill up's by removing a portion of the fill neck inside the tank. The piece removed was put there originally to reduce potential spillage from diesel fuel foaming. It ended up making it hard for the last couple of gallons to make it into the tank. The Hutch Mod replaces the restrictive factory in-tank pickup setup with hard lines and an external filter. It also moves the return line further away from teh pickup to reduce air introduced into teh fuel supply (return fuel is always full of air). Both allow for a better supply of fuel to the lift pump and everything downline of it. Parts for the Hutch mod have been discontinued by Riffraff Diesel, however they are available from many respectable shops online. These instructions will be using the old Riffraff Diesel kit, however whichever kit you use will require very similar steps. Let's dive into the install:
Recommended Tools:
- 5/16” and 3/8” Fuel Line disconnect tools.
- Standard Wrenches & Sockets
1. Reduce the fuel in the tank to less than 1/8 of a tank to make handling of the tank easier.
2. You may remove the bed or lower the fuel tank to accomplish this kit install. Instructions below are for removing the tank from the truck.
3. For trucks with a fuel tank skid plate, remove the skid plate by removing the attachment bolts and remove the skid plate.
4. Remove the clamps from the fuel tank filler neck and the vent pipe. These will normally be stuck to the filler pipe. Use a smooth and round pick to work the hose around the tube until it loosens.
5. Support the fuel tank with a floor jack with a piece of wood to distribute the weight across the bottom of the tank. You may also use tie down straps to support the tank to aid in lowering.
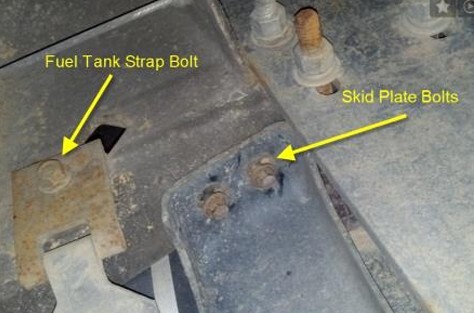
6. Locate the fuel tank attach strap bolts at the frame rail and remove them.
7. Lower the tank to gain access to the fuel and electrical connections.
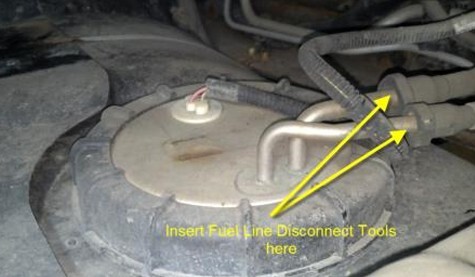
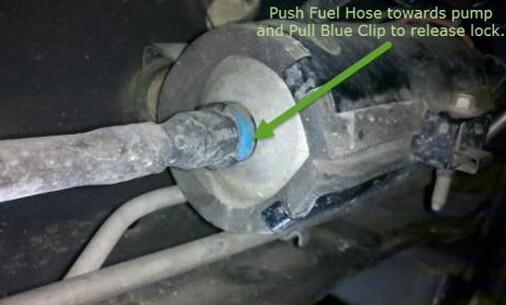
8. Using the fuel line disconnect tools, disconnect the feed line using the 3/8” disconnect tool. The return line requires use of the 5/16” disconnect tool. You will need to push the fuel line towards the tank fitting while inserting the tool to release the lock on the connector.
9. Remove the electrical connection.
10. Lower the fuel tank slowly while feeding the fill and vent hoses over the frame rail. You will also need to ensure the tank vents are free while the tank is lowered.
11. Slide the tank from under the truck and clean the top of the tank thoroughly.
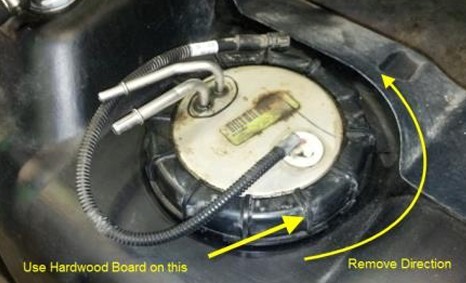
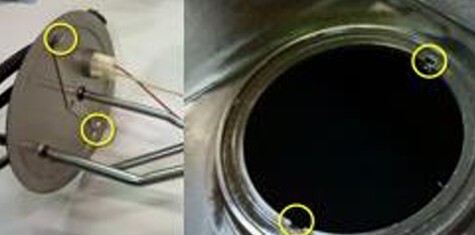
12. Remove the tank sending unit retainer ring by unthreading it. You can use a block of wood to tap on the flanges around the retaining nut to unthread it. It will take a few sharp blows to loosen it, then it should unscrew normally.
13. Remove the retaining ring and you can now pull the sending unit from the tank using caution to not bend the float arm.
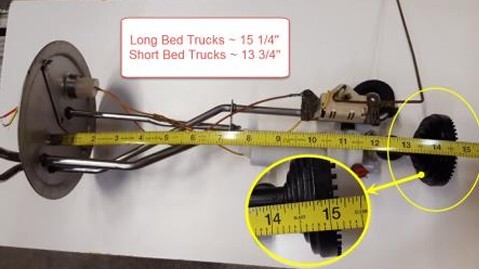
14. Take a measurement from the fuel pickup foot to the bottom of the sending unit and record length to reinstall too ____________ (Long Beds ~ 15 ¼” Short Beds ~ 13 ¾”)
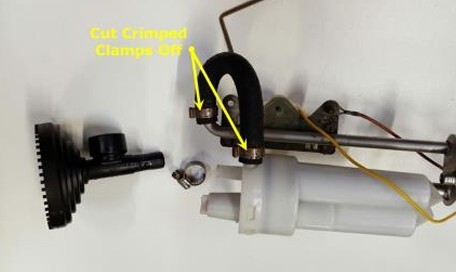
15. Cut the crimped on band clamp from the mixing chamber to the return tube. You can use a cutoff wheel for this.
16. Remove the mixing chamber from the fuel sender tube.
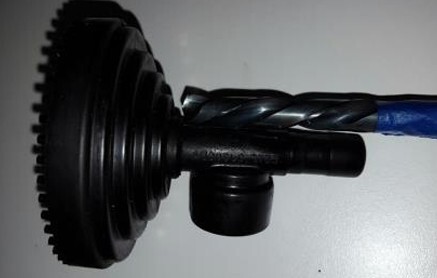
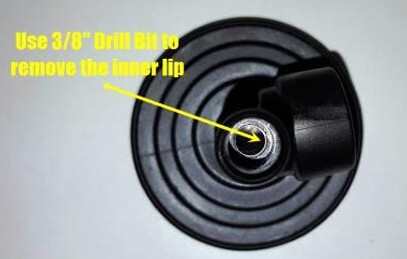
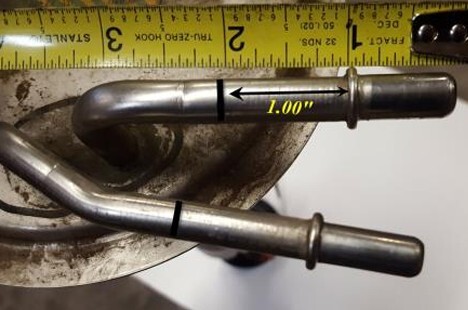
17. Remove the screen from the bottom of the pickup foot. Use a 3/8” drill bit and open up the neck of the pickup to allow the 3/8” extension tube to be slid into the neck.
18. Install the 3/8” extension tube into the pickup neck. Slide the hose clamp onto the pickup neck, do not tighten.
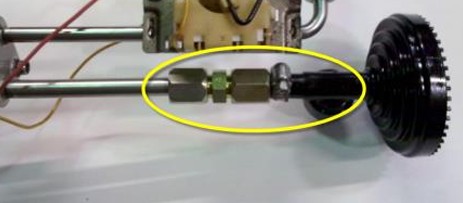
19. Install the compression fitting onto the sender tube and tighten down finger tight to seat the compression ferrule. Tighten another 1 ½ turns to fully crimp the ferrule to the tube.
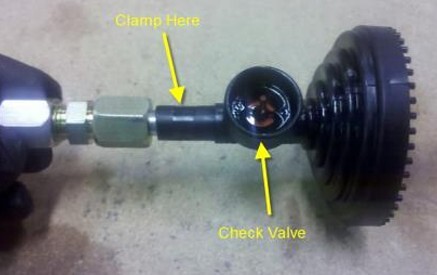
20. Install the pickup and tube into the compression fitting and snug down finger tight.
21. Measure the distance from the bottom of the sender to the pickup foot. This should be the same distance as recorder in step 14. If you need to adjust the length, you can slid the pickup up or down the new extension tube to fine tune the length. Make sure the extension tube is inserted beyond the pickup check valve or you will ingest air into the fuel pump.
22. Once the length is achieved, tighten the hose clamp from step 18.
23. Final tighten the pickup and extension tube into the compression fitting by tightening another 1 ½ turns to fully crimp the ferrule to the tube.
24. Install the short section of 5/16” fuel line to the return tube to allow fuel to flow further away from the pickup.
25. Ensure the float can move freely and does not interfere with anything.
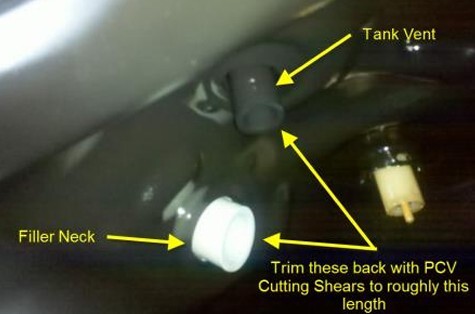
26. Inside the tank you can perform the “Harpoon Mod” by cutting back the plastic filler and vent tubes to allow faster fill-up and top-off of the fuel tank. Use a pair of PVC Cutters to trim back the length.
27. Re-Install the fuel tank sender assembly into the fuel tank making sure you install it in the same position as removal.
28. Install the retainer ring and tighten down using the wood and tapping with a hammer. It may be difficult to start the threads on the ring, but even pressure will help align the ring to the tank.
29. Apply a mark onto the fuel sender lines 1” beyond the flange for the quick connect lock. This will be used to ensure positive engagement when the hose is applied.
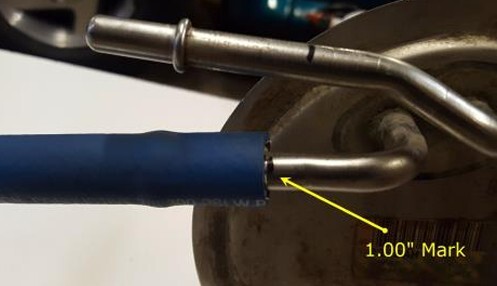
30. Attach the 3/8” fuel hose to the senders 3/8” feed line. You will need to ensure the hose is warm and a little lubrication on the feed line will help in sliding the hose onto the line.
31. Attach the 5/16” fuel hose to the senders 5/16” feed line. You will need to ensure the hose is warm and a little lubrication on the feed line will help in sliding the hose onto the line.
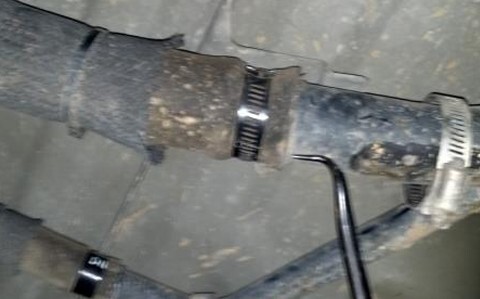
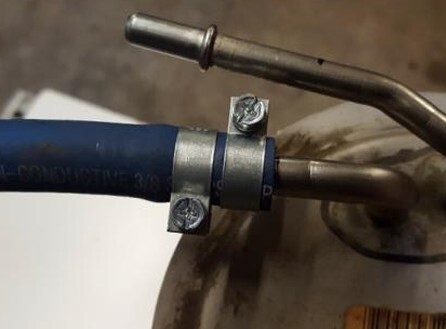
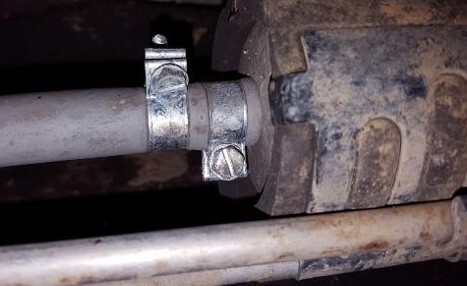
32. Install (2) clamps on each hose assembly to ensure positive clamping. Offset the clamps from each other for maximum clamping force coverage.
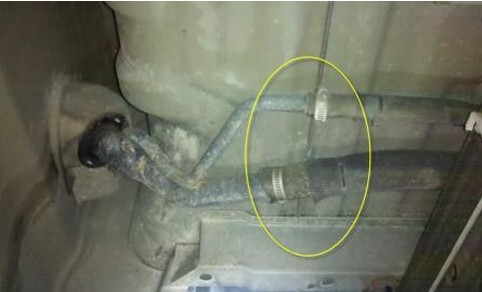
33. On the frame rail, cut off the OEM hose sections from the lines. You will be sliding the new hose onto these as you did in the last steps.
34. Slide the fuel tank under the truck and position where you can connect the electrical and fuel lines.
35. Install the hose sections to the frame rail lines and clamp with double clamps.
36. Raise the fuel tank into the final position guiding the filler neck and vent hoses over the frame rail. Ensure the fuel lines from the frame rail are not riding or kinked. Verify electrical connection is not riding either.
37. Install the fuel tank straps and tighten bolts.
38. Install clamps to filler neck and vent tubes.
39. Install the fuel tank skid plate if removed.
40. At the fuel pump on the drivers side frame rail, remove the quick disconnect fuel coupling from the fuel pump. Cut off the existing hose from the fixed tube and discard.
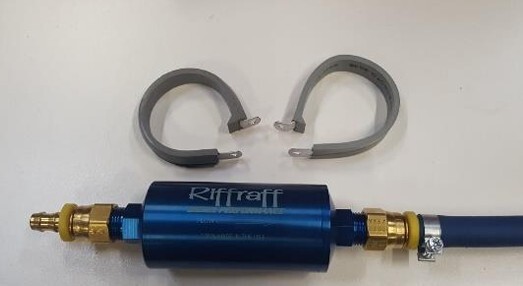
41. Locate the Riffraff Diesel Fuel Filter or equivalent with fittings (P/N 30682-8-6) to attach the 3/8” Diesel Rated Fuel hose from the fixed fuel lines to the pump. The filter will be placed between the hard line and the fuel pump with two sections of hose.
42. Once you cut the hose to fit, push the hoses onto the fuel filter fittings and double clamp them with fuel injection clamps.
43. Attach one hose to the fuel line and the other to the fuel filter using double clamps to ensure a leak free condition.
44. Clamp the fuel filter to the frame rail using 2” clamps to support the filter.
45. Replenish diesel fuel to the tank.
46. Turn the key and cycle it several times to prime the pump and build pressure and vacuum in the fuel pump supply line.
Pictures and instructions provided by Ken “Woodnthings” on FTE
Disclaimer: The information provided on this blog is for informational purposes only. We share our knowledge and experience, but we are not liable for any damages, injuries, or losses that may occur as a result of using this information. Situations are rarely cut and dry in the automotive world. Your situation will likely be somewhat different than what we describe here. Use your best judgment and always consult a qualified professional for automotive repairs and modifications. Your safety is your responsibility.


